C-3PO the Master Teacher configuration guide

Formatting the Arduino
After the Arduino IDE is installed, you need to do two things: first you must
format the Arduino, then you must upload the servo control software. To format the Arduino
you can use the code from the Ozeki website (http://www.ozeki.hu/index.php?owpn=3110)
or from the Arduino website (https://www.arduino.cc/en/Tutorial/EEPROMClear).
I prefer to use the Ozeki code, because it will blink the led on the Arduino when it is finished, so I know, that I can proceed with
the next step.
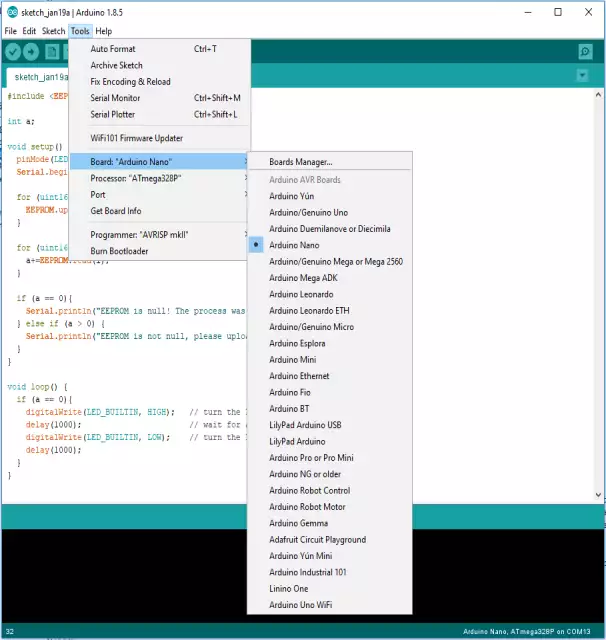
To format the arduino you have to select the "Arduino Nano" board model, and the correct serial port from the tools menu.

#include <EEPROM.h>

int a;

void setup() {
  pinMode(LED_BUILTIN, OUTPUT);
  Serial.begin(115200);

  for (uint16_t i = 0; i < EEPROM.length(); ++i) {
    EEPROM.update(i, 0);
  }

  for (uint16_t i = 0; i < EEPROM.length(); ++i) {
    a+=EEPROM.read(i);
  }

  if (a == 0){
    Serial.println("EEPROM is null! The process was successfull!");
  } else if (a > 0) {
    Serial.println("EEPROM is not null, please upload the code again!");
  }
}

void loop() {
  if (a == 0){
    digitalWrite(LED_BUILTIN, HIGH);   // turn the LED on (HIGH is the voltage level)
    delay(1000);                       // wait for a second
    digitalWrite(LED_BUILTIN, LOW);    // turn the LED off by making the voltage LOW
    delay(1000);
  }
}
Installing the servo software on the Arduino
The servo motor controller software is responsible for opening and closing the PEZ candy dispenser. It uses the OzServoController.h module, that is installed, when you install Ozeki 10 on your computer. Note that port 11 is used when the servo motor controller configuration is added. You might also notice, that -45 degrees is set as the startup position for the servo motor.
#include <OzIDManager.h>
#include <OzServoController.h>

OzIDManager* manager;
OzServoController* servocontroller;

void setup()
{
  Serial.begin(115200);

  manager = new OzIDManager;
  manager->_sendACK = true;
  manager->_checksum = true;

  OzCommunication::setIDManager(manager);

  servocontroller = new OzServoController;
  servocontroller->AddMotorconfig(11, ServoMotors::SERVO_SG90,-45);

  int x=1;
  manager->sendLinkSetup();
  manager->PrintWelcomeLine(servocontroller, x++, "MyServoMotor");
  servocontroller->showMotorDetails();
}

void loop()
{
    OzCommunication::communicate();
}
The source code
The robot source code has two important entry points: The Start and the Receive
functions. When you press Run in the toolbar, the Start function is executed by
the system. In this function you need to subscribe for messages coming from
the text to speech and the speech to text engine.
The robot is started by sending a "Hello, please answer the question!" message
to the text to speech connection. When the text to speech engine receives this
message, it will read it out on the PC speaker. When it finishes, it will send a
"Complete" message to the robot controller.
All incoming messages are received by the Receive function of the control code.
In this function we can decide how we want to react to each message.
using System;
using System.Media;
using System.Threading;
using System.Threading.Tasks;

namespace Ozeki
{
    public class Program
    {
        enum StateType {WaitingForQuestionToComplete, WaitingForAnswer, WaitingForResultToComplete}
        StateType State;

        public void Start()
        {
            SystemSounds.Beep.Play();
            Subscribe("My_text_to_Speech_1@localhost");
            State = StateType.WaitingForResultToComplete;
            Send("My_text_to_Speech_1@localhost","Hello, please answer the question!");
        }

        public void Receive(Message msg)
        {
            if(msg.FromConnection=="My_speech_to_Text_1@localhost")
            {
                if (State != StateType.WaitingForAnswer) return;
                Unsubscribe("My_speech_to_Text_1@localhost");
                evaluateResult(msg.Text);
            }

            if(msg.FromConnection=="My_text_to_Speech_1@localhost" && msg.Text=="Complete")
            {
               if (State == StateType.WaitingForQuestionToComplete)
               {
               	  Thread.Sleep(1000);
                  State = StateType.WaitingForAnswer;
                  Subscribe("My_speech_to_Text_1@localhost");
               }
               else if (State == StateType.WaitingForResultToComplete)
               {
                  askNextQuestion();
               }
            }
        }

        int expectedResult;
        void askNextQuestion()
        {
            State = StateType.WaitingForQuestionToComplete;
            Random random = new Random();
            int a = random.Next(0, 10);
            int b = random.Next(0, 10);
            expectedResult = a+b;
            Send("My_text_to_Speech_1@localhost","What is "+a+" plus "+b);
        }

        void evaluateResult(string text)
        {
            State = StateType.WaitingForResultToComplete;
            var result = OzCommonStrings.ToInt(text);
            if (result==expectedResult) {
                Send("My_text_to_Speech_1@localhost","Very good! The answer was "+result+". "+
                    "You can take your candy.");
                dispenseCandy();
            } else {
                Send("My_text_to_Speech_1@localhost","No way! The result is not "+result+". "+
                     "The correct answer is "+expectedResult.ToString());
            }
        }

        void dispenseCandy()
        {
           Send("MyServoMotor@localhost","+45");
           Thread.Sleep(6000);
           Send("MyServoMotor@localhost","-45");
        }
    }
};
