Case study: How to build a plant watering system
Automatic plant watering keeps your plants healthy. You can be anywhere doing anything, Ozeki will automatically water your plants. By installing Ozeki on a computer and by placing plant watering modules in your garden or home, you can watch your plants grow. It is useful after you have finished planting your fruits or vegetables. What if your plants could be independent from rain? Whenever the soil gets dry, plants can be watered automatically.
What will you learn?
Plant watering system overview
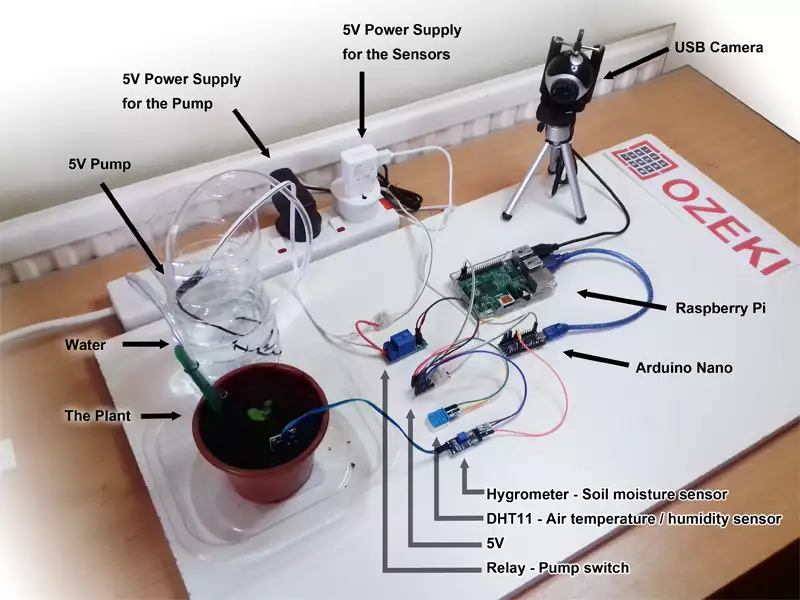
Watering plants is a part of everyday life. Plants are in our home, in our garden, next to the sidewalk or even on the roof. Watering them can be time consuming especially if you have dozens of them. Ozeki was designed to take control over watering with the help of a simple construction you can see on Figure 1.

Features
System components
You can see the set of required components on Figure 2. The Raspberry Pi is the central unit connecting and controlling electronic components with the help of an Arduino module (Nano, Uno or Mega). Because the sensors (soil hygrometer and DHT11/DHT22) and relay are controlled by the Arduino. The relay is switched On/Off to turn the pump on or off. The pump in this example is a submersible pump which is placed in water (plastic bottle) as you can see below on Figure 2.

Required components
- Ozeki (download newest version)
- Raspberry Pi
- Arduino Nano, Uno or Mega
- Soil moisture sensor (soil hygrometer)
- Water pump (submersible or jet pump) with pump switch relay
- Jumper wires and at least 1 USB cable
(between Raspberry Pi and Arduino)
Optional components
- One of the following DHT air temperature, humidity sensors:
DHT11: - 0-50 °C (+/- 2°C accuracy)
- 20-80 RH (5% accuracy)
- Gets new data in every 2 seconds
DHT22: - -40-80 °C (+/- 0.5°C accuracy)
- 0-100 RH (2-5% accuracy)
- Gets new data in every 2 seconds
- USB camera
Wiring the system
After acquiring the system components you can connect them with standard wires and USB cables as you can see on Figure 3. The small sensors and the relay is connected to the Arduino with thin copper wires wrapped in colorful plastic coatings. The USB camera and Arduino Nano are connected to the Raspberry Pi with USB cables. The USB cables are black lines on Figure 3. You can connect to the Raspberry Pi using internet access.

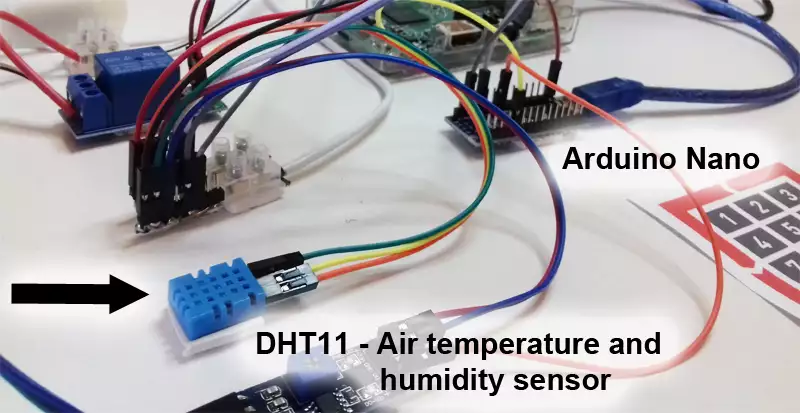
The colorful wires connects the sensors (DHT11, Hygrometer) and the relay to the Arduino pins (Figure 4). The Raspberry Pi, Arduinio and sensors are powered from the same outside power outlet. The DHT11 sends the current humidity and temperature data in digital form to Arduino pin D2. The soil hygrometer sends analog data (to pin A5) which can be converted with an integrated analog to digital converter in the Arduino. The relay can be controlled by setting the digital pin (D13) to output. The relay is essential to turn on or off the submersible pump.

Supplying water and measuring soil moisture
Watering systems can simultaneously water plants and measure soil moisture (Figure 5). This system can precisely calculate the water required in real time. Water is essential for life. It can dissolve minerals from soil so every plant can absorb essential nutrients for their growth. Water required depends on how deep the roots of the plant go. More watery soil can be reached by deeper roots, so even if the top of the soil is dry, deep down it can be wet for the roots.

Collecting data on the PC
Raspberry Pi is basicly a small PC that collects data from your plants. If you would like you can control your watering system through any other PC. It is not necessary to use a Raspberry Pi. In this construction a Raspberry Pi 3 is used to save more power and space. It is not necessary to buy a PC just for plant watering.
Data from Arduino and USB camera are cought by the Raspberry Pi (Figure 6). The Raspberry Pi has an internet connection (Wifi or LAN) so it can reach you 24/7 in case of any critical situation requiring human intervention. Through Ozeki10 software it can store sensor data in SQL databases and contact you in e-mail or SMS. You could reach your SQL database from anywhere in the world. You can also watch the camera feed of the plant(s) from any remote destination.

The watering subsystem
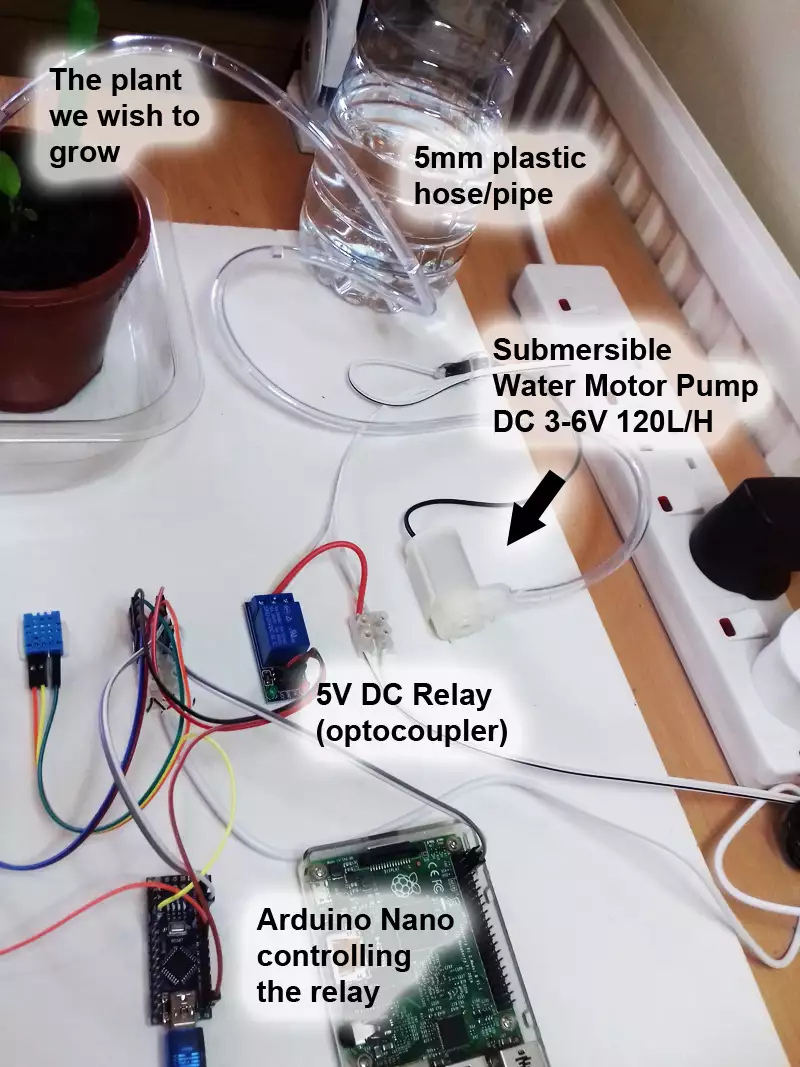
This plant watering system has many subsystems, but the most important subsystem is directly responsible for watering soil. The pump controller subsystem has the biggest role (Figure 7). A submersible water pump is powered from a DC converter, which is plugged into the power outlet. In this example the pump will be placed in a bottle full of water.
A relay controls the pump. The relay can turn On/Off the pump by controlling the flow the electricity. The relay is controlled by an Ardunio and the Arduino is controlled by the Raspberry Pi with the Ozeki Devicehandler Communication protocol, which is a set of commands and parameters through the USB port of the Raspberry Pi.

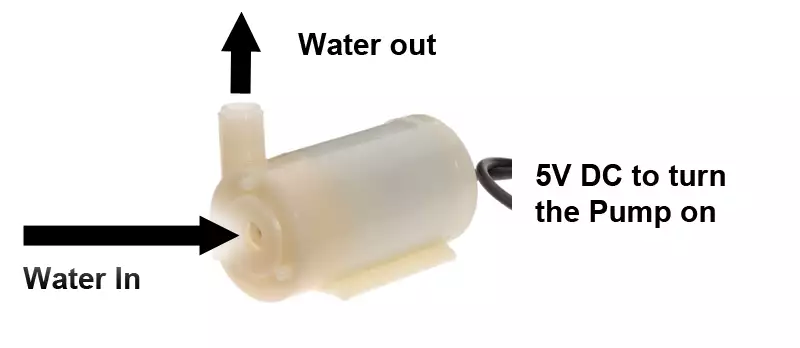
Submersible (Figure 8) and jet pumps are the most commonly used pump types. Submersible pumps push fluid to the surface as opposed to jet pumps having to pull fluids. Please check if only pure water is going through your pump. If the noise of the pump is not familiar or the water pressure is too low than air can be in the pipes. Air in the pipes can cause the pump to overheat. It is also good to know the water temperature to keep the motor safe from overheating.

Collecting soil moisture data
Electricity flow can be measured between moisture sensor legs (Figure 9). Electricity easily flows through watery soil while the throughput of dry soil is nearly 0. The value is sent to one of the analog pins you can find on the Arduino.
The Ozeki Analog Sensor libraries can be uploaded to the Arduino, because they can handle moisture data and forward it to the Raspberry Pi automatically. Please test or check the watering needs of your plant and set the limits in Ozeki software. This software can be easily installed on any Raspberry Pi and bigger computers like a PC or laptop.

Collecting Air Temperature and Humidity data
DHT sensor is a perfect solution to measure air temperature and humidity which will be sent to the Arduino in digital signals (Figure 10). These signals are automatically transfered every 2 sec in 40 bit packages and Ozeki DHT libraries automatically read them. The Raspberry Pi asks the value from the Arduino using the Ozeki Devicehandler Communication protocol. Plants love high humidity and warm temperatures as in glasshouses.

Supplying power to the sensors
All sensors connected to the Arduino are supplied with 5V from the same power outlet (Figure 11). This adapter powers the Arduino and Raspberry Pi as well. The soil moisture sensor needs 5V between the two electrodes you stick in the soil. The DHT sensor needs energy to measure temperatue and humidity. The relay also needs 5V to control the pump.
For example the standard voltage in an USB cable is 5V, which is an industry standard. A different power adapter powers the pump, since it consumes higher power. The original adapter wouldn't be able to handle if we add up the power of the pump. The pump also works with a 5V adapter.

How to setup the Arduino
Step 1: Format the Arduino's EEPROM
It can happen that there is no serial communication between the Ozeki Devicehandlers and Raspberry Pi. This can happen if the EEPROM of the Arduino is not formatted. You are strongly advised to upload the code below to the Arduino (Source Code 1). You can use the Arduino IDE. The code will automatically run after it has been uploaded.
Raspberry Pi is a small PC. You can use any other PC or laptop as well with Ozeki software.
Arduino is a microcontroller which needs the following code:
#include <EEPROM.h>

void setup() {
    //clear the EEPROM
    for (int i = 0 ; i < EEPROM.length() ; i++)
    {
	    EEPROM.write(i, 0); //to number i EEPROM register it writes value: 0
    }
    pinMode(LED_BUILTIN, OUTPUT);
}

void loop() {
    // blink the led to give feedback
    digitalWrite(LED_BUILTIN, HIGH);   // turn the LED on (HIGH is the voltage level)
    delay(1000);                       // wait for a second
    digitalWrite(LED_BUILTIN, LOW);    // turn the LED off by making the voltage LOW
    delay(1000);
}
Step 2: Install the sensor software
The programcode below (Source Code 2) makes connection between the sensors and Raspberry Pi or any other PC or laptop running Ozeki. Please upload this programcode to your Arduino. You can use Arduino IDE to do this.
The code will automatically start every time you power your Arduino. The code will forward data from the sensors to the Raspberry Pi and back from the Raspberry Pi to the relay.
With Ozeki Devicehandlers you are able to handle an extremely wide variety of devices. You can view the devices for plant watering in Source Code 2. (DHT sensor is an optional sensor, so if you do not need it, just simply delete it from the code by deleting #include OzDHTController.h. The constructors and methods belonging to the DHT controller also needs to be deleted if you do not use OzDHTController.h)
The Arduino will use the following devicehandlers for plant watering:
- Ozeki Analog Sensor (for moisture sensor)
- Ozeki Switch Controller (for relay)
- Ozeki DHT Controller (for DHT sensor)
#include <OzIDManager.h>
#include <OzAnalogSensor.h>
#include <OzDHTSensor.h>
#include <OzSwitchController.h>

OzIDManager* manager;
OzAnalogSensor* analogSensor;
OzDHTSensor* dhtTemperature;
OzDHTSensor* dhtHumidity;
OzSwitchController* switchController;

void setup()
{
  Serial.begin(115200);

  manager = new OzIDManager;
  manager->_sendACK = true;
  manager->_checksum = true;

  OzCommunication::setIDManager(manager);

  analogSensor = new OzAnalogSensor(A5);
  analogSensor->reset();
  dhtTemperature = new OzDHTSensor(DHT22,DHTMode::Temperature,2);
  dhtHumidity = new OzDHTSensor(DHT22,DHTMode::Humidity,2);
  switchController = new OzSwitchController(13);

  int x=1;
  manager->sendLinkSetup();
  manager->PrintWelcomeLine(analogSensor, x++, "AnalogSensor");
  manager->PrintWelcomeLine(dhtTemperature, x++, "TemperatureSensor");
  manager->PrintWelcomeLine(dhtHumidity, x++, "HumiditySensor");
  manager->PrintWelcomeLine(switchController, x++, "SwitchController");
}

void loop()
{
    analogSensor->ownLoop();
    dhtTemperature->ownLoop();
    dhtHumidity->ownLoop();
    OzCommunication::communicate();
}
The current setup let's you to control the pump according to the soil moisture, air temperature, air humidity measurements. Program your Ozeki Robot Controller to set them up.
