Weather Station
This project guides you through the construction of a microcontroller-based weather station that can stream data to ManyLabs lessons or show data on an optional OLED screen.
Important
- The rain, wind speed, and wind direction sensors can be outside in rain and snow. The rest of the sensors, and the Arduino, need to be shielded from inclement weather. All of the sensors should be brought inside for severe inclement weather.
- This project includes cutting and may required supervision or help from an adult.
- If you decide to mount some or all of the sensors outside, you'll likely need additional hardware specific to your sensor placement.
Contents
- Materials and Tools
- Assemble wind and rain sensors
- Mount Sensors
- Connect Sensors to Arduino
- Configure Arduino and Sensors
- Using the Weather Station
- Exploration Questions
Materials and Tools
One Weather Kit or equivalent materials
If you'd like to place the weather station outside, you'll also need:
- Disposable plastic food container large enough hold the Arduino and sensors
- Razor knife
- Double-sided foam tape
Assemble wind and rain sensors
- Slide the metal poles together. It's a tight fit.
-
Insert the T-shaped plastic arm into the top of the pole. There's a notch on one side, so you may need to rotate it. This will hold the wind speed and direction sensors.
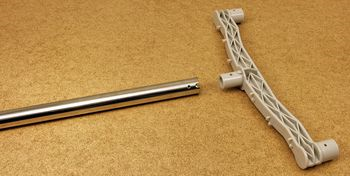
Figure 1 - Weather Station Sensor T-shaped plastic arm -
Fasten the arm to the poles with the larger screw and a bolt.

Figure 2 - Weather Station Sensor with the fastened T-shaped plastic arm -
Attach the other plastic arm lower on the pole. It has two pieces to clamp onto the pole.
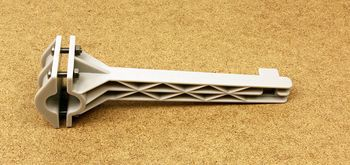
Figure 3 - The lower plastic arm of the Weather Station Sensor -
Slide the sensors onto the plastic arms. The wind sensors have notches, so you may need to rotate them.
-
Fasten the wind sensors to the T-shaped arm with bolts. There's a hexagonal indentation on one side for the nut.

Figure 4 - The Weather Station Sensor with the fastened wind sensor -
Fasten the rain sensor to the smaller arm with the small screw. It attaches from the bottom.
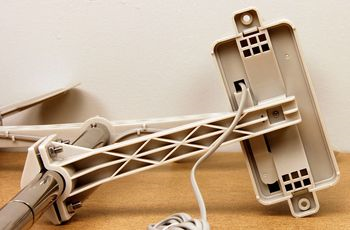
Figure 5 - The Weather Station Sensor with the fastened rain sensor -
The wind sensors share a cable. Plug the wind speed sensor into the bottom of the wind direction sensor.

Figure 6 - The Weather Station Sensor with the wind sensor and the wind direction sensor
Mount Sensors
Depending on how you decide to mount the sensors outside, you may need additional hardware to attach the pole to another structure. The kit includes zip-ties and pipe-clamps which could be used to attach the sensor pole to a fence or similar structure. If you need help, please contact us at support@manylabs.org.
Here's some general information to help get the most from the sensors:
- The wind sensors should be mounted horizontally and allowed to spin freely.
- The rain sensor should be under open sky, not under an overhang that will shield it from the rain or direct rain into it.
- The other sensors, and the Arduino, should not be allowed to get wet.
- Mount the wind and rain sensors, and the container for the Arduino and other sensors, in an easy to access place.
Weather Underground has some more information about how to place your sensors for the best reading.
Connect Sensors to Arduino
-
Attach the Arduino, wind/rain adapter board, and rubber feet to the Arduino base plate:
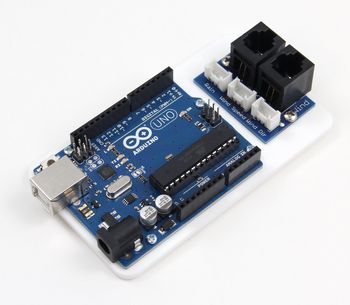
Figure 7 - The top of the Arduino base plate Figure 8 - The bottom of the Arduino base plate The adapter board looks like this:
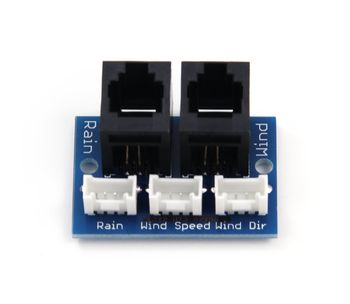
Figure 9 - The adapter board of the Arduino -
Attach the sensors and rubber feet to the sensor base plate:

Figure 10 - The top of the Arduino Weather Sensor 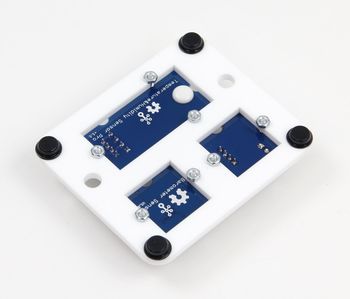
Figure 11 - The bottom of the Arduino Weather Sensor, with the fastened rubber feets -
Connect the wind and rain gauges to the adapter board.
-
We recommend using these connections on the Grove shield:
Device Arduino Pin Rain Gauge D2 Wind Speed D3 Wind Direction A0 Light Sensor A2 Temperature and Humidity D7 Barometric Pressure I2C
Configure Arduino and Sensors
- If you haven't already, install the WireGarden browser plugin. You can follow the instructions in the Using Sensors documentation.
- Connect your Arduino to a USB port on your computer and open the Weather Station sketch in the Arduino Programmer tool.
- Select the Arduino Uno in the first selection box marked
Microcontroller. - Select the port your Arduino is connected to in the second selection box. On Windows this will be something like
COM2(The Arduino is usually the highest number), on a Mac or Linux machine this will start withttyand will usually haveusbin the name. - Click the
Optionstab to configure the pins that you'll use for connecting the sensors. Their defaults will be filled already. - Important The rain gauge must be connected to digital pin 2. On an Arduino Uno, no device should be configured to use analog pins 4 or 5; The barometric pressure sensor uses these pins.
- Click
Send to Arduinoand wait for the process to finish. If there are errors, make sure you selected the correct type of Arduino and the correct port and try again. If you're still having trouble e-mailsupport@manylabs.org.
Using the Weather Station
The weather station can, using the sketch above, show realtime data on an OLED screen. It can also stream data to two ManyLabs lessons. For short term and quickly updating data, use the Weather Station Lab. For long term recording, use the Weather Station Tool. The Weather Station Tool can also send data to a Weather Underground account to get personalized forecasts.
Exploration Questions
- How does temperature relate to humidity?
- How does pressure relate to wind speed?
- What patterns do you see in wind direction?
- How does air pollution relate to time of day?
- Does air pollution change with wind speed or direction?
- How does your weather compare to the nearest official weather station? What might cause differences?
Original content from: manylabs.org
