How to connect a TSL2561 luminosity sensor to Arduino
Contents
Introduction
The TSL2561 luminosity sensor is an advanced digital light sensor, ideal for use in a wide range of light situations.The TSL2561 is an inexpensive, yet sophisticated sensor.
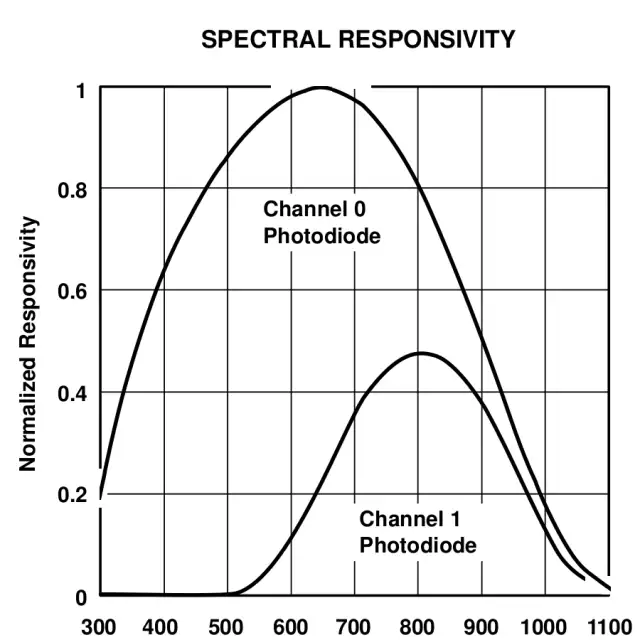
Unlike simpler sensors, like photoresistors and photodiodes, the TSL2561 incorporates both infrared and visible light sensors to better approximate the response of the human eye.
Because the TSL2561 is an integrating sensor, it is capable of measuring both very small and very large amounts of light.
Compared to low cost CdS cells, this sensor is more precise, allowing for exact Lux calculations and can be configured for different gain/timing ranges to detect light ranges
from up to 0.1 - 40,000+ Lux on the fly. The best part of this sensor is that it contains both infrared and full spectrum diodes!
That means you can seperately measure infrared, full-spectrum or human-visible light.
Most sensors can only detect one or the other, which does not accurately represent what human eyes see (since we cannot perceive the IR light that is detected by most photo diodes).
Specification
- Approximates Human eye Response
- Precisely Measures Illuminance in Diverse Lighting Conditions
- Temperature range: -30 to 80 *C
- Dynamic range (Lux): 0.1 to 40,000 Lux
- Voltage range: 2.7-3.6V
- Interface: I2C
- This board/chip uses I2C 7-bit addresses 0x39, 0x29, 0x49, selectable with jumpers

Wiring
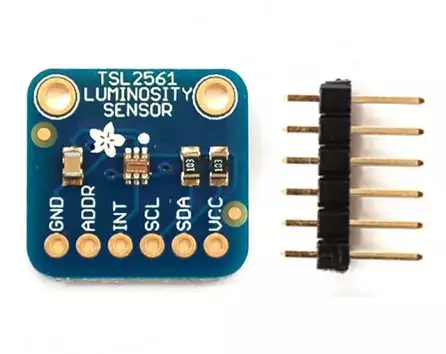
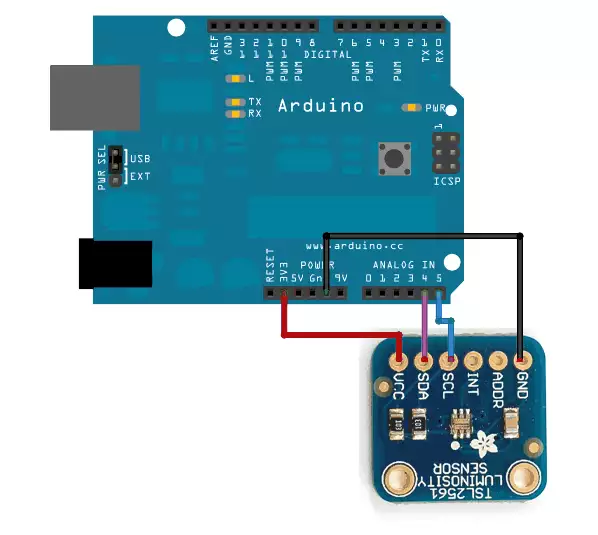
This is an easy to use sensor for every creator. There are 6 pins int he TSL2561 Luminsity sensor. There are 4 you have to use in this project. In the following table you can see which pins you have to pair with the Arduino:
| TSL2561 Lumiosity Sensor Pin | Arduino Pin |
| VCC | 3.3V |
| GND | GND |
| SDA | Analog pin #4 |
| SCL | Analog pin #5 |
| INT | No need to connect |
| ADDR | No need to connect |
- Connect the VCC pin to a 3.3V power source. The sensor cannot be used with anything higher than 3.3V so don't use a 5V supply!
- Connect GND to the ground pin.
- Connect the SCL to Analog pin #5
- connect the SDA to Analog pin #4
You don't need to connect the INT (interrupt output) or AADR pins.

Code example
To be able to use this sensor you will need to download and install the Adafruit Sensor Library:
You will also need the Adafruit Sensor library if you do not already have it installed.
You can download it by clicking on this button to get the compressed Zip. Then install as you did before.
If you installed the libraries, as a next step, restart the IDE. Now you will be able to start the Code example. You can find the example in the following place: File->Examples->Adafruit_TSL2561->sensorapi. This example will calculate the lux reading for you. The code is quite easy to use. You can set the sensor in the first line. In this row, you can supply the I2C ADDR and you can give a unique name to your sensor. In this example the unique name is 12345.
Adafruit_TSL2561 tsl = Adafruit_TSL2561(TSL2561_ADDR_FLOAT, 12345);
If you want to configure the gain or the integration time you can modify it in the code. You can set 0-16 gain depending on the situation. The 0 extra gain is good in bright environment while in dim place the 16 gain is preferable.
You can also change the integration time, which is how long it will collect light data for. The longer the integration time, the more precision the sensor has when collecting light samples.
In the new v.2.0 driver, you can choose the auto-gain option. In this case the computer will modify the integration time and the gain level depending the situation. The results will be calculated in standard SI lux units.
void configureSensor(void)
{
tsl.enableAutoRange(true);

tsl.setIntegrationTime(TSL2561_INTEGRATIONTIME_13MS);
erial.println("------------------------------------");
Serial.print  ("Gain:         "); Serial.println("Auto");
Serial.print  ("Timing:       "); Serial.println("13 ms");
Serial.println("------------------------------------");
}

If you optimised the variables depending your enviroment you can start measuring luminous intensity. For this purpose, you can simply call getEvent with a reference to the sensors_event_t object where the sensor data will be stored.
sensors_event_t event;
tsl.getEvent(&event);
if (event.light)
{
Serial.print(event.light); Serial.println(" lux");
}
else
{
Serial.println("Sensor overload");
}
This function will return a reading in SI lux units, which is probably the easiest unit to understand when working with light. Now you will able to create your own project and calculate the result yourself.
