How to connect a YL-83 Raindrop sensor to Arduino
Contents
Introduction
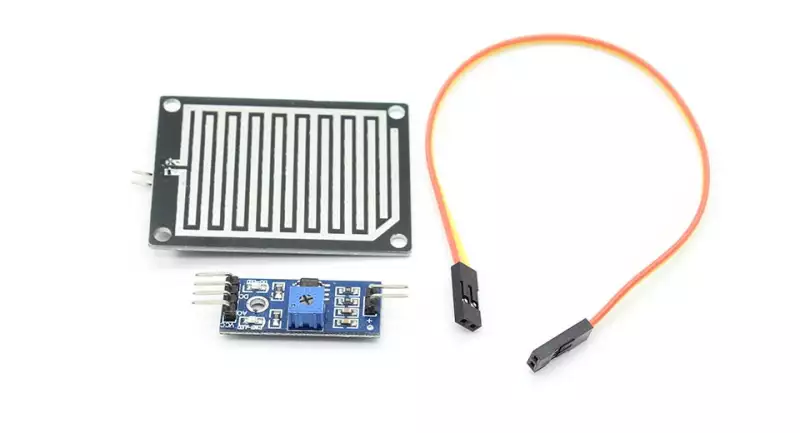
The item is for Arduino robot kit, raindrops, rain sensor, monitoring can be used for a variety of weather conditions, and converted into the number of the reference signal and the AO output.
This is an unexpensive but great tool for measuring weather conditions. It is a great sensor for beginners and experts too.
The sensor uses the FR-04 high-quality double-sided materials, King Size 5.0 * 4.0CM, and with the surface of the nickel plating treatment, against oxidative, conductivity, superior performance and longevity;
The output in the form: digital switching outputs (0 and 1) and analog AO voltage output;
TTL-level output, TTL output valid signal is low. Driving capability 100MA so, can directly drive relays, buzzer, a small fan, and so on.
Sensitivity can be adjusted via potentiometer
LED lights up when there is no rain output is high, raindrop up, the output ground level, LED light.
Features:
- Distribution bit to adjust sensitivity
- A fixed bolt hole for easy installation
- Power indicator, the output signal LED indicator
- The comparator output, the signal is clean, waveform, driving ability over 15mA
- Wide voltage LM393 comparator
- A large area of rain board, more conducive to detect rain
- Board with positioning holes to facilitate installation
- Raindrops and control panels are separate, easy to wire leads
Specification
Small board PCB size: 3.2cm x 1.4cm
Operating voltage: 3.3V-5V
Voltage: 5V
Dimensions: 1.26 in x 0.55 in x 0.39 in (3.2 cm x 1.4 cm x 1.0 cm)
Weight: 0.88 oz (25 g)

Wiring
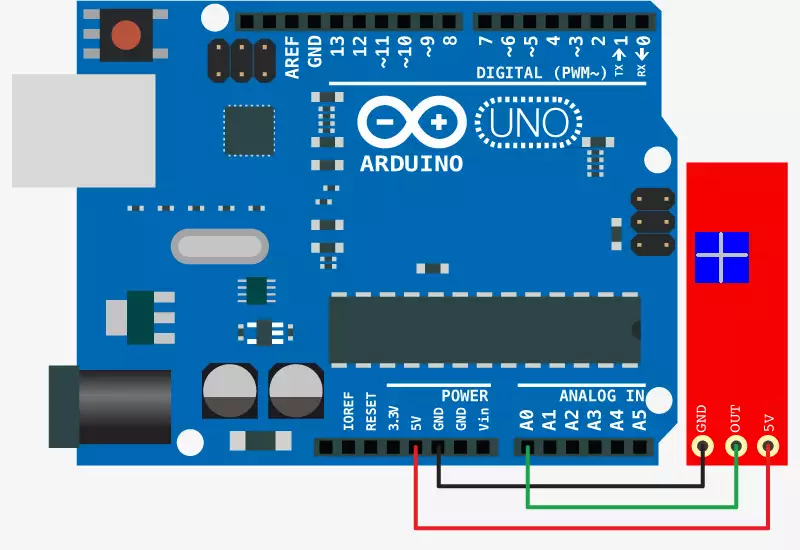
Connected to 5V power supply, the power indicator light, sensor board is not water droplets.
DO output is high, the switch lights off, dropping on a drop of water, DO output is low, the indicator light switch, Brush off the the above water droplets, has returned to output high state.
AO analog output can be connected to the microcontroller AD port to detect the size of the drops in the above rainfall.
DO TTL digital outputs can also be connected to the microcontroller detects whether there is rain.
| YL-83 Pin | Arduino Pin |
| VCC | Rositive power supply (3,3V-5V) |
| GND | GND |
| DO | TTL switching signal output |
| AO | Analog signal output (A0) |

Example code
The code is easy to use, just paste it into the Arduino IDE and start the program. If started you can see that in dry condition the results are 1000+, as the sensor get wet, the numbers will fall under 300-400.
void setup(){
// initialize serial communication at 9600 bits per second:
Serial.begin(9600);
}

void loop() {
// read the input on analog pin 0:
int sensorValue = analogRead(A0);

Serial.println(sensorValue);
delay(100);
}
